Erik loves to eat salad. His idea of a good dinner is a big salad.
I don't dislike salad, but after eating a 'salad for a meal' I am generally not full. Or, if I feel satisfied, I'm hungry an hour later. They just don't stick with me.
Recently, however, I decided to give it another try. I came across THIS recipe for chicken/squash/chickpea salad w/ tahini dressing and figured I'd give it a try. Go check out the recipe, but let me tell you what I did differently.
• Instead of squash, I used a sweet potato.
• I forgot to add the chickpeas (didn't have any on hand).
• Instead of pita chips, I took plain flour tortillas, cut them up and thew them in the oven after the chicken was done roasting. I let them stay there until they were crisp. Then added them to the salad.
• I added slivers of a red pepper. And also very thin onion slivers.
• For the dressing, I added extra lemon juice.
How was it? Smashing success! I was honestly surprised how much the salad filled me up. Even without the chickpeas. I bet with chickpeas, it would have been even MORE filling!
One of my favorite parts was the dressing ... oh how good it is! I am often scared of recipes with ingredients (like tahini) that I'm like 'what am I going to do with the rest of the jar?' .... but don't be. If you get tahini to make this dressing, you can also make hummus using tahini.
Seriously - give it a try!

Tuesday, March 20, 2012
Monday, March 19, 2012
Chore chart/meal planning revisited
About 4 months ago, I started a chore chart to help me stay on top of house cleaning. I have also been attempting to do a better job of meal planning.
There were pros and cons to each system, and I've made a revision I hope I will love.
Last week, I was reading a photographer's blog and the post was about being organized in your work space. About half way down the post, it showed a few photos of 'workflow' charts .... which I have several of in my own office. It had the charts behind glass, however, and utilized dry erase markers to show progress. GENIUS!
Here's what I've done ....
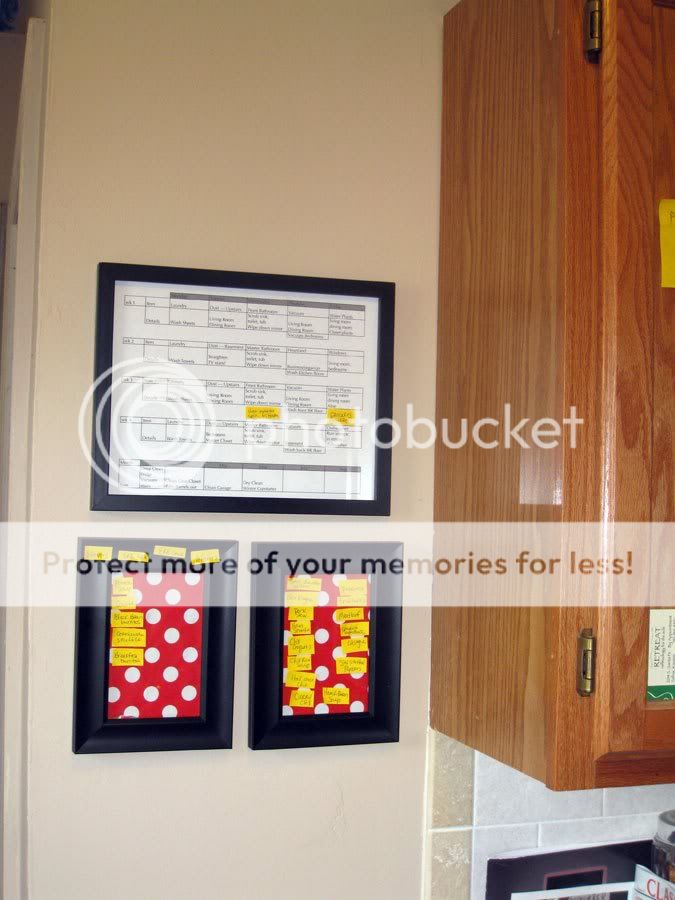
I printed a new copy of my cleaning/chore chart. And put it in one of those certificate frames (which perfectly fit a piece of computer paper!). I'll just use a dry erase marker to cross things off when I'm done.
The frames beneath? Remember my meal planning? Well, I left a teensy bit extra room beneath each day/chore for a meal sticker.
I picked up new Post It notes .... they have ones that are sticky on the ENTIRE back. So I wrote some of our favorite meals on them and cut them up into small pieces. I grabbed 2-4x6 frames I previously displayed photos in and grabbed some wrapping paper to spruce it up some. I actually will probably snag a little scrapbooking paper from my sis to use, but this stuff is just filler. It's red b/c while the walls are pretty tan, we will probably bring in some red touches elsewhere in the kitchen. SO, I put the extra meals on these frames when not in use.
The frames before:
So there you have it ... I'm going to give this awhile and see how I like it. I have high hopes. :)
There were pros and cons to each system, and I've made a revision I hope I will love.
Last week, I was reading a photographer's blog and the post was about being organized in your work space. About half way down the post, it showed a few photos of 'workflow' charts .... which I have several of in my own office. It had the charts behind glass, however, and utilized dry erase markers to show progress. GENIUS!
Here's what I've done ....
I printed a new copy of my cleaning/chore chart. And put it in one of those certificate frames (which perfectly fit a piece of computer paper!). I'll just use a dry erase marker to cross things off when I'm done.
The frames beneath? Remember my meal planning? Well, I left a teensy bit extra room beneath each day/chore for a meal sticker.
I picked up new Post It notes .... they have ones that are sticky on the ENTIRE back. So I wrote some of our favorite meals on them and cut them up into small pieces. I grabbed 2-4x6 frames I previously displayed photos in and grabbed some wrapping paper to spruce it up some. I actually will probably snag a little scrapbooking paper from my sis to use, but this stuff is just filler. It's red b/c while the walls are pretty tan, we will probably bring in some red touches elsewhere in the kitchen. SO, I put the extra meals on these frames when not in use.
The frames before:
So there you have it ... I'm going to give this awhile and see how I like it. I have high hopes. :)
Saturday, March 17, 2012
Dining room progress!
I took more photos with my other camera, but this is just a few quick grabs from today!
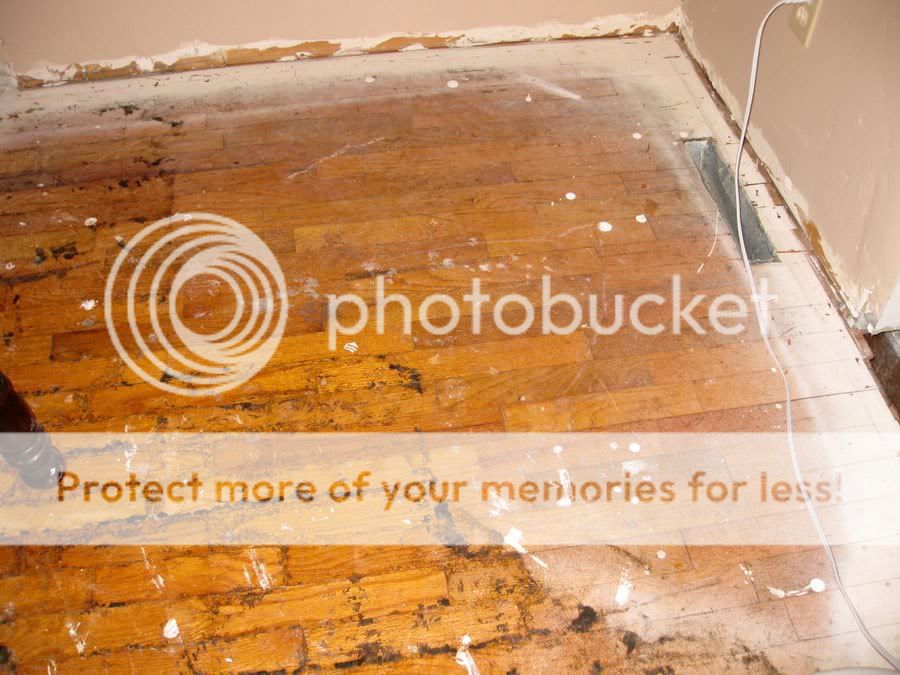
We tore the carpet up, and some of the floor was almost perfect. The rest ... as you can see, looks like there was an adhesive of some sort on it? Or maybe a bad carpet cleaning job? Who really knows?
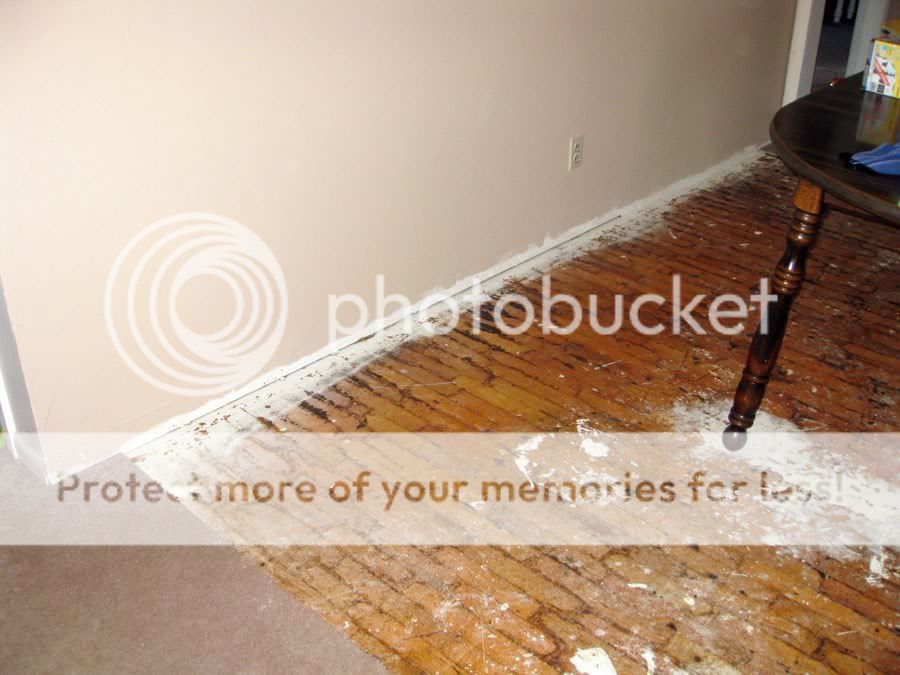
More of the floor. It's actually very pretty. We REALLY wanted to save it ... but it doesn't seem possible. Which makes us both sad, sad, sad.
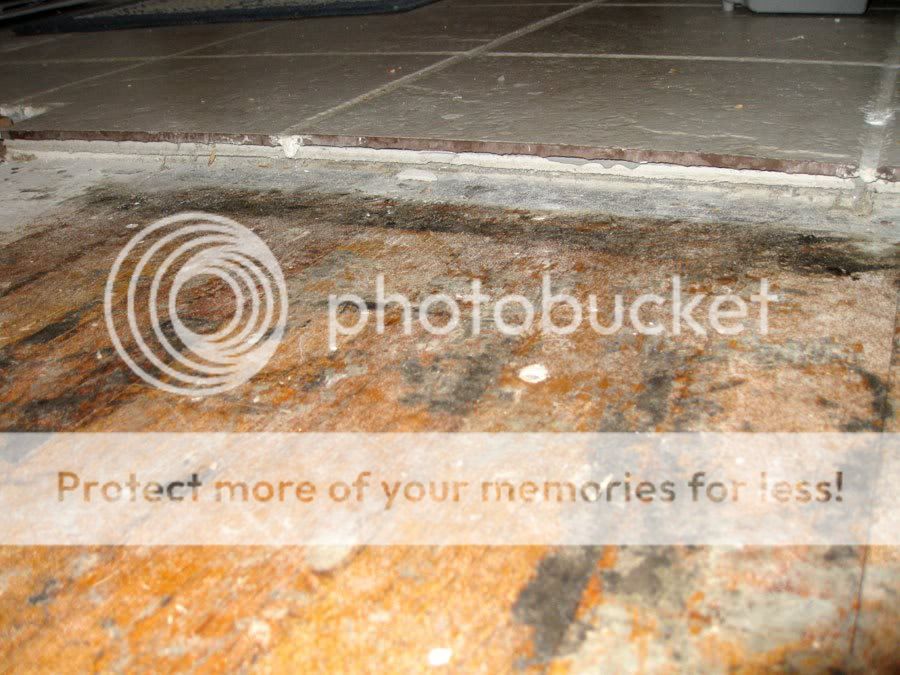
Here is why we don't think we can save the floor: The tile in the kitchen. Fortunately, we know the person Erik bought the house from ... and I asked him how he put the tile in. He said he used 'thinset' to adhere 1/4 inch backerboard to the floor. And also used 1 1/4 inch roofing nails to secure it. Then installed the tiles.
Those who I have talked with seem to think the nails would damage the floor terribly, and not be extremely repairable. Not to mention if the thinset would come up easily.
Just makes my heart SO SAD because the floors aren't in bad shape at all. Sort of makes me want to shake the fella who covered them up.
We're limiting our new flooring to the kitchen/dining rooms. Maybe there's a big plywood hole in the living room floor? But we wouldn't even see it.
Regardless, we can REALLY see how this will look with a new floor ... and are seriously excited!!!! :) :) :)
We tore the carpet up, and some of the floor was almost perfect. The rest ... as you can see, looks like there was an adhesive of some sort on it? Or maybe a bad carpet cleaning job? Who really knows?
More of the floor. It's actually very pretty. We REALLY wanted to save it ... but it doesn't seem possible. Which makes us both sad, sad, sad.
Here is why we don't think we can save the floor: The tile in the kitchen. Fortunately, we know the person Erik bought the house from ... and I asked him how he put the tile in. He said he used 'thinset' to adhere 1/4 inch backerboard to the floor. And also used 1 1/4 inch roofing nails to secure it. Then installed the tiles.
Those who I have talked with seem to think the nails would damage the floor terribly, and not be extremely repairable. Not to mention if the thinset would come up easily.
Just makes my heart SO SAD because the floors aren't in bad shape at all. Sort of makes me want to shake the fella who covered them up.
We're limiting our new flooring to the kitchen/dining rooms. Maybe there's a big plywood hole in the living room floor? But we wouldn't even see it.
Regardless, we can REALLY see how this will look with a new floor ... and are seriously excited!!!! :) :) :)
Thursday, March 15, 2012
Being married to an editor
Erik is an editor. He edits words. Everyday. On occasion, he's been known to edit school papers for my siblings. :)
Yet he also chooses photos routinely for the paper. Which one best fits/tells the story or goes with the words? Often when we're watching a movie, I'll comment when there's fantastic light. Erik has started to pick up on it, and has occasionally made comments. It makes my heart swell with pride.
At the same time, Erik is also a 'civilian' so to speak. When I'm editing photos, he's a great person to pull in and say 'which one do you like better' when I simply can't decide.

Here's a great example. Mike and I shot a wedding on Saturday and I have two very similar images. I like them both, but couldn't quite decide. So I pulled Erik in.
Honestly, I was a bit more drawn to the left image. Yet immediately, Erik said "OH NO, the right one is SO much better." He explained how much nicer he thought the bride looked when she was smiling. I tend to like somber images, but Erik is a 'civilian' in the photo world, and it's true, many people like pix of themselves smiley. It's good to have him here to remind me of that. :)
Let this serve as a reminder to me: Smiley photos have their place in the world.
Here's the lesson for you: Not ALL photos have to be smiley. Especially if/when you're dealing w/ kids.
Yet he also chooses photos routinely for the paper. Which one best fits/tells the story or goes with the words? Often when we're watching a movie, I'll comment when there's fantastic light. Erik has started to pick up on it, and has occasionally made comments. It makes my heart swell with pride.
At the same time, Erik is also a 'civilian' so to speak. When I'm editing photos, he's a great person to pull in and say 'which one do you like better' when I simply can't decide.
Here's a great example. Mike and I shot a wedding on Saturday and I have two very similar images. I like them both, but couldn't quite decide. So I pulled Erik in.
Honestly, I was a bit more drawn to the left image. Yet immediately, Erik said "OH NO, the right one is SO much better." He explained how much nicer he thought the bride looked when she was smiling. I tend to like somber images, but Erik is a 'civilian' in the photo world, and it's true, many people like pix of themselves smiley. It's good to have him here to remind me of that. :)
Let this serve as a reminder to me: Smiley photos have their place in the world.
Here's the lesson for you: Not ALL photos have to be smiley. Especially if/when you're dealing w/ kids.
Wednesday, March 14, 2012
Kitchen/Dining room in progress
Oh how close we're coming! Well, most of our part of the kitchen/dining project is over. The big part. We've painted the walls!

The trim you see in the background is the original color everything was ... but once I'm done w/ it, the trim will be white.
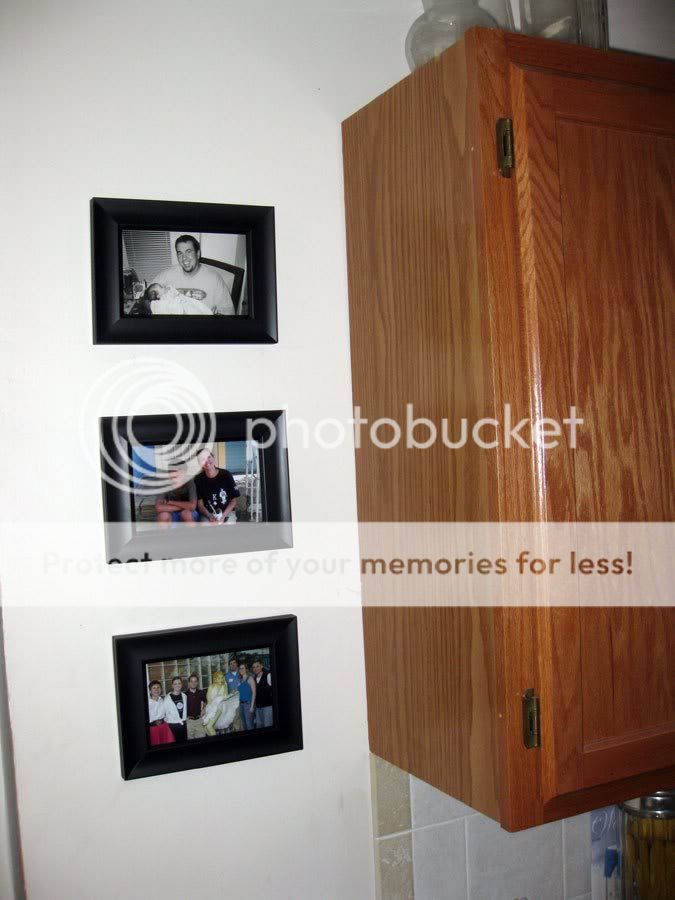
Yet seeing the dining room now, with no photos on the walls ... it feels so empty/naked! (see our dining room wall w/ photos on it HERE).
Part of me really wanted to choose a more bold color for the dining room/kitchen room. Yet because we have a variety of photos/art that we hang on our walls with a variety of colors, going with a tan/khaki color seemed to be the smartest/most versatile option.
Yes, there is no baseboard (we tore it out), and yes, there is dust ALL OVER the table. It's been a bit of a disaster zone around here lately. Yet we now are (almost) ready for the laminate floors to be installed.
No, we will not be installing the floors. I am convinced it is a home project that our marriage could not survive. After interviewing a few people, we've settled on one I feel very confident in working with.

This is how our sample looks in the dining room. A friend will come over Saturday to help me tear the carpet out. Yes, I realize the walls aren't perfect, but it's something I have decided I am willing to live with. Seriously. Sanding and mudding and sanding is a disaster (see above dust-covered dining room table). I decided "good enough" and moved on. Besides, I consulted this super-handy guide to selecting a paint finish and selected a flat/matte finish. Seriously, even though there are imperfections in the walls, it's not overly visible.

Here's how it will look in our kitchen, with our cabinets. The tile will stay in place. The installer will just 'float' it in over the tile. Then he'll put baseboards in everywhere. So the strip of unpainted wall at the bottom won't be visible.
Speaking of painting ... I finally got hip and realized there is the option to buy combined paint/primer. I was a little skeptical, but we decided to give it a try. So far, so good. We have 2 coats of paint on the walls and it seems to do the trick. The one 'down' side is I couldn't purchase this in a 5-gallon bucket. I really wanted to because we intend to paint the living room the same color. Yet you can't get the combo paint/primer in the 5-gallon buckets. I would guess it has to do with not being able to use this effectively on NEW drywall. And I'd guess mostly contractors are buying paint by the 5-gallons. So it makes sense.
Ok, so that's what's up around here. Just trim painting for me .... and carpet removing. But then I am DONE with my part of the project. Then it will be in our installer's hand! :)
The trim you see in the background is the original color everything was ... but once I'm done w/ it, the trim will be white.
Yet seeing the dining room now, with no photos on the walls ... it feels so empty/naked! (see our dining room wall w/ photos on it HERE).
Part of me really wanted to choose a more bold color for the dining room/kitchen room. Yet because we have a variety of photos/art that we hang on our walls with a variety of colors, going with a tan/khaki color seemed to be the smartest/most versatile option.
Yes, there is no baseboard (we tore it out), and yes, there is dust ALL OVER the table. It's been a bit of a disaster zone around here lately. Yet we now are (almost) ready for the laminate floors to be installed.
No, we will not be installing the floors. I am convinced it is a home project that our marriage could not survive. After interviewing a few people, we've settled on one I feel very confident in working with.
This is how our sample looks in the dining room. A friend will come over Saturday to help me tear the carpet out. Yes, I realize the walls aren't perfect, but it's something I have decided I am willing to live with. Seriously. Sanding and mudding and sanding is a disaster (see above dust-covered dining room table). I decided "good enough" and moved on. Besides, I consulted this super-handy guide to selecting a paint finish and selected a flat/matte finish. Seriously, even though there are imperfections in the walls, it's not overly visible.
Here's how it will look in our kitchen, with our cabinets. The tile will stay in place. The installer will just 'float' it in over the tile. Then he'll put baseboards in everywhere. So the strip of unpainted wall at the bottom won't be visible.
Speaking of painting ... I finally got hip and realized there is the option to buy combined paint/primer. I was a little skeptical, but we decided to give it a try. So far, so good. We have 2 coats of paint on the walls and it seems to do the trick. The one 'down' side is I couldn't purchase this in a 5-gallon bucket. I really wanted to because we intend to paint the living room the same color. Yet you can't get the combo paint/primer in the 5-gallon buckets. I would guess it has to do with not being able to use this effectively on NEW drywall. And I'd guess mostly contractors are buying paint by the 5-gallons. So it makes sense.
Ok, so that's what's up around here. Just trim painting for me .... and carpet removing. But then I am DONE with my part of the project. Then it will be in our installer's hand! :)
Monday, March 12, 2012
In the dog house / patio/fence debacle
We installed a gate to our patio/backyard to contain the dog. Right? Right.
BEFORE:
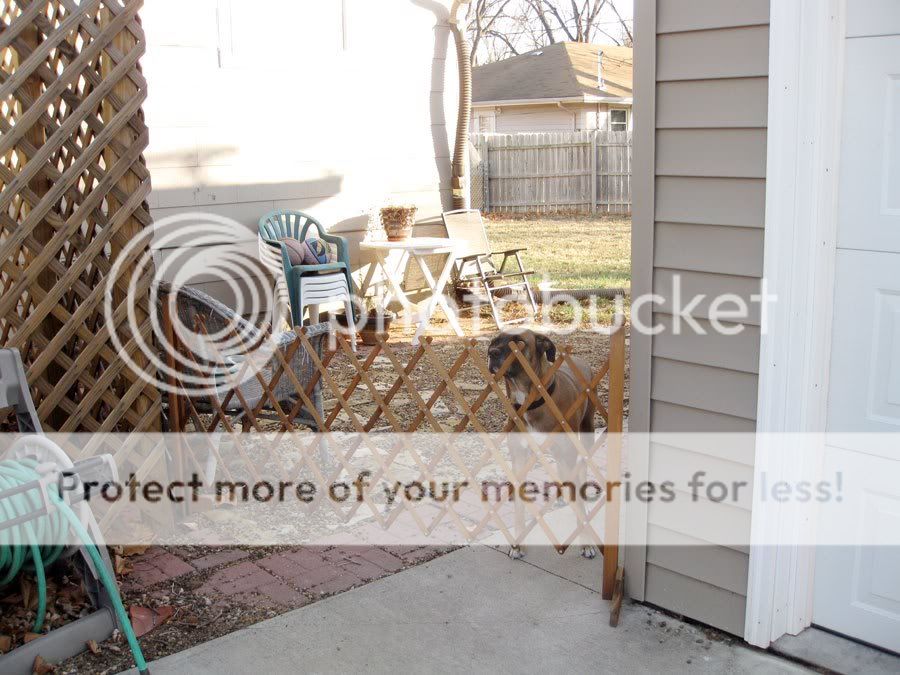
AFTER:

She's contained, see?
Well, she WAS contained.
One day, she squeezed through the neighbor's wabbly fence. We took care of that and patted ourselves on the back. All done!
Not quite.
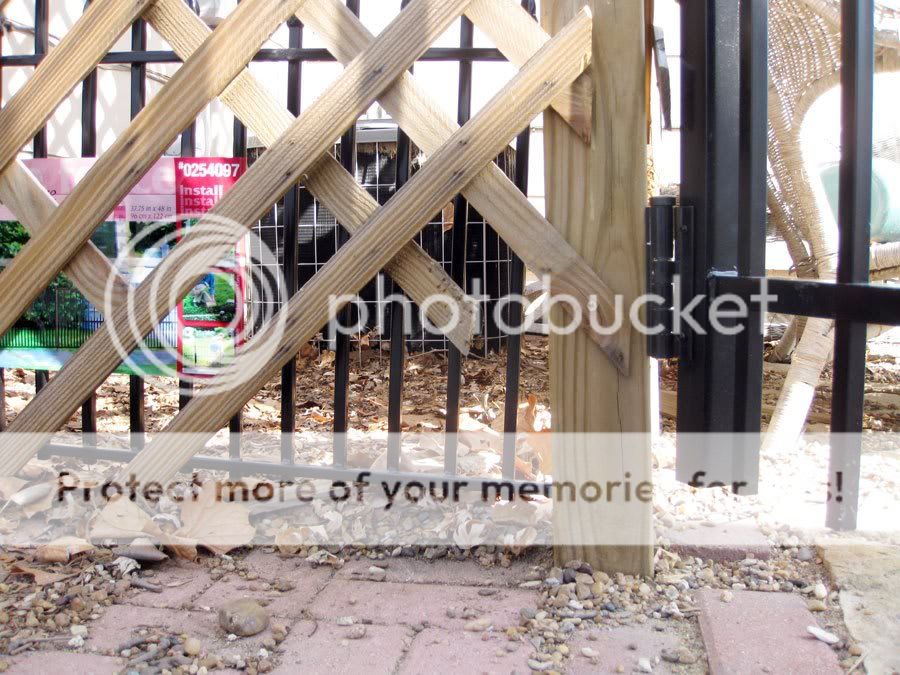
About a week later, she was out. I couldn't figure out how. Until I saw ... THIS ....


STINKIN' DOG broke through the lattice and wiggled out.
THIS IS WAR, I declared.
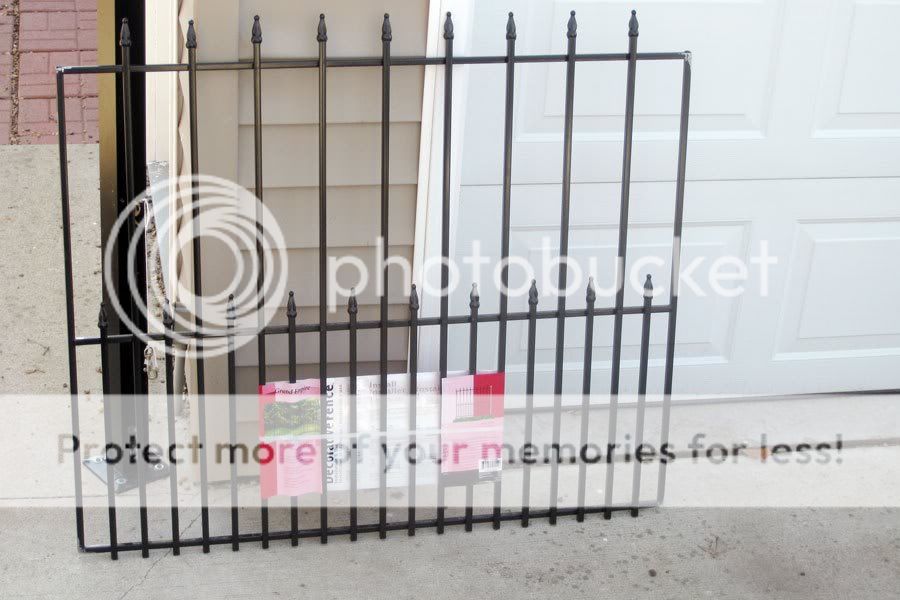
I went and selected this from the home improvement store. Our buddy had to help get rid of the loops/attachments on the side, but once he did, it fit into the space PERFECTLY.
I, in my typical (Polish) fashion came up with all sorts of complex ways to affix the fence piece to the post. We were walking down the aisle and Erik said 'what about a zip tie?' .... and holy cow, they make zip ties in 2-foot lengths! Genius. I love it when Erik has fabulous yet simple solutions to the issue I'm trying to solve.
Notice how the 'tails/ends' of the zip ties are pointing into the backyard area? This will be important later.
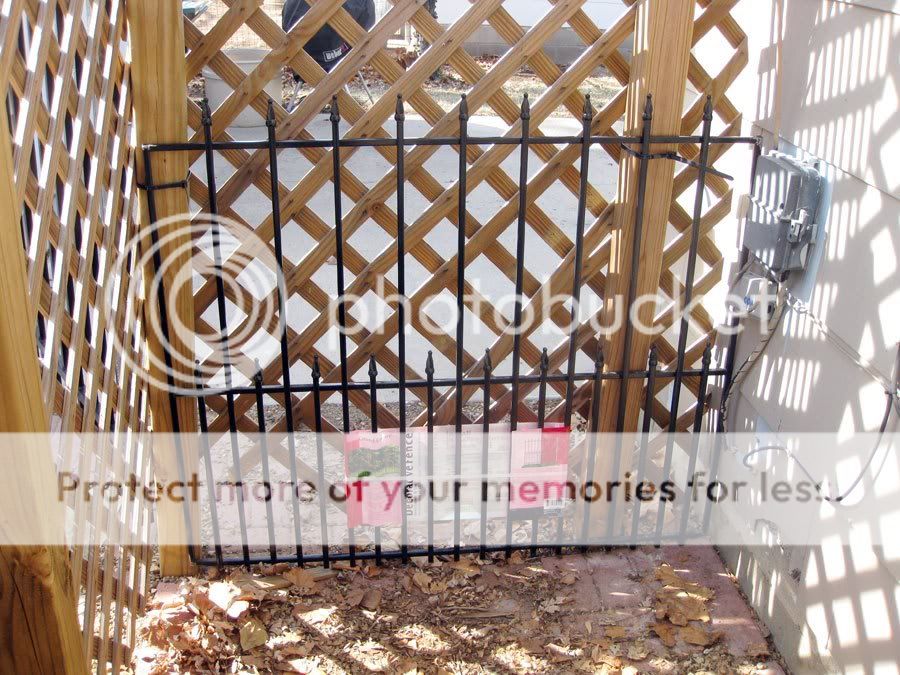
So I put the fence length in and put on just 2 of the ties to see how I liked it. I'd show Erik when he awoke from his nap.
I put the dog outside, and patted myself on the back. I HAD WON.
Then, there was the most awful noise from outside. I'm not sure what exactly was going on, but I go out and someone must have taken the tails/ends and started pulling on them. That or pulling on the fence. AND BROKE THEM. :( :( :(
Let's not talk about how livid I was.

I readjusted and did the zip ties again ... but left the extra on the OUTSIDE of the fence, so the do had nothing to pull on. And I secured it with a tie on the top/bottom of each side. This thing was FAR more stable.
Plus, it covers the hole.
Since the zip-tie mishap, things have been better. Sure, she cries/whines some, but it's actually decreased significantly. I suspect one of the neighbor dogs made fun of her for crying like a baby in the backyard. She will still occasionally whine, but sometimes, she will just sit by the back door and stare at me until I let her out, and then not want to come back in. So I shut the gate and let her roam around.
Everyone *seems* happy with this arrangement.
BEFORE:
AFTER:
She's contained, see?
Well, she WAS contained.
One day, she squeezed through the neighbor's wabbly fence. We took care of that and patted ourselves on the back. All done!
Not quite.
About a week later, she was out. I couldn't figure out how. Until I saw ... THIS ....
STINKIN' DOG broke through the lattice and wiggled out.
THIS IS WAR, I declared.
I went and selected this from the home improvement store. Our buddy had to help get rid of the loops/attachments on the side, but once he did, it fit into the space PERFECTLY.
I, in my typical (Polish) fashion came up with all sorts of complex ways to affix the fence piece to the post. We were walking down the aisle and Erik said 'what about a zip tie?' .... and holy cow, they make zip ties in 2-foot lengths! Genius. I love it when Erik has fabulous yet simple solutions to the issue I'm trying to solve.
Notice how the 'tails/ends' of the zip ties are pointing into the backyard area? This will be important later.
So I put the fence length in and put on just 2 of the ties to see how I liked it. I'd show Erik when he awoke from his nap.
I put the dog outside, and patted myself on the back. I HAD WON.
Then, there was the most awful noise from outside. I'm not sure what exactly was going on, but I go out and someone must have taken the tails/ends and started pulling on them. That or pulling on the fence. AND BROKE THEM. :( :( :(
Let's not talk about how livid I was.
I readjusted and did the zip ties again ... but left the extra on the OUTSIDE of the fence, so the do had nothing to pull on. And I secured it with a tie on the top/bottom of each side. This thing was FAR more stable.
Plus, it covers the hole.
Since the zip-tie mishap, things have been better. Sure, she cries/whines some, but it's actually decreased significantly. I suspect one of the neighbor dogs made fun of her for crying like a baby in the backyard. She will still occasionally whine, but sometimes, she will just sit by the back door and stare at me until I let her out, and then not want to come back in. So I shut the gate and let her roam around.
Everyone *seems* happy with this arrangement.
Saturday, March 10, 2012
Lazing around the house

I don't get my cat. Seriously. She gets herself at an angle to sleep COMPLETELY on my purse-like-bag. Um ... strange.

And the dog. Well, she likewise wants to be on something soft. So when I cover myself with a blanket and put my feet up, if there's a corner, she'll find it. And when I toss the blanket off? All the better. :)
Thursday, March 8, 2012
Vents = CHECK!
BEFORE:

AFTER:
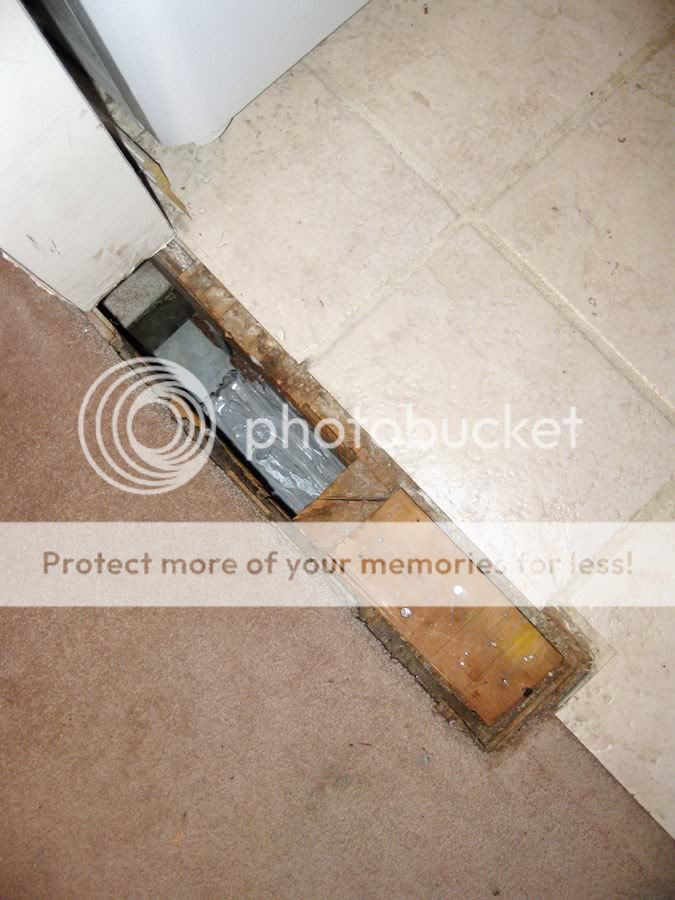
Yes, there's still a hole, but the metal component is completely gone!!!! The hole is probably 12-14 inches worth of hole, but in a few weeks, it'll be covered w/ a new floor and so it won't matter anyway!!!!!
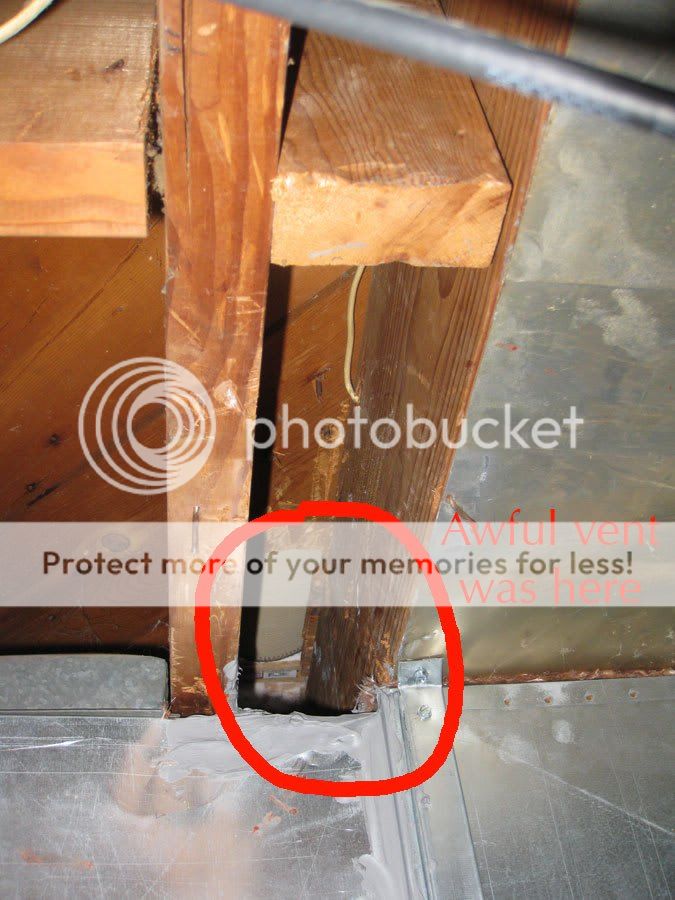
I circled the area where it was before ... it's hard to imagine, but it was there. I was completely impressed the guys could get it out of there. I had a bit of a runaround getting their quote formally/in writing and getting them nailed down for a time to do the work, but they did a fantastic job ... I'm seriously and insanely pleased!

This is now in our laundry room. Seriously, I had NO IDEA how huge this would be .... but it carries our air over to under the sink. There's a vent that comes out in the 'toe-kick' area under the sink. I forgot to take a photo of it, sorry. We've both noticed the air blowing, though, and think it was a great call!
There is a slight 'T' off to the right ... eventually we'll finish off about 100 more square feet of the basement into a more 'formal' office for me to work in. It doesn't have a vent, and we had them put it in while they were doing the other vent work anyway. Even though that project is 12-18 months off, it should be easier when it's time!
Now to sand and prep the walls, then prime + paint.
In other home projects, the hinges for the orange room have arrived. They aren't a 100% perfect fit, but they're close enough. I've put a few on and have about 4 more doors to go. I can hardly wait for this room to be finished!!!!
AFTER:
Yes, there's still a hole, but the metal component is completely gone!!!! The hole is probably 12-14 inches worth of hole, but in a few weeks, it'll be covered w/ a new floor and so it won't matter anyway!!!!!
I circled the area where it was before ... it's hard to imagine, but it was there. I was completely impressed the guys could get it out of there. I had a bit of a runaround getting their quote formally/in writing and getting them nailed down for a time to do the work, but they did a fantastic job ... I'm seriously and insanely pleased!
This is now in our laundry room. Seriously, I had NO IDEA how huge this would be .... but it carries our air over to under the sink. There's a vent that comes out in the 'toe-kick' area under the sink. I forgot to take a photo of it, sorry. We've both noticed the air blowing, though, and think it was a great call!
There is a slight 'T' off to the right ... eventually we'll finish off about 100 more square feet of the basement into a more 'formal' office for me to work in. It doesn't have a vent, and we had them put it in while they were doing the other vent work anyway. Even though that project is 12-18 months off, it should be easier when it's time!
Now to sand and prep the walls, then prime + paint.
In other home projects, the hinges for the orange room have arrived. They aren't a 100% perfect fit, but they're close enough. I've put a few on and have about 4 more doors to go. I can hardly wait for this room to be finished!!!!
Tuesday, March 6, 2012
The starting line!
OOOOh, today is the day! This afternoon is THE afternoon. After getting quotes and gathering information, we have someone coming in to move the vent from the space where a wall once stood. YES!
There will likely still be a hole tomorrow, but the vent will be more 'formally' closed off. And we'll have a new one under the sink! Sweetness.
The floor installer has also been scheduled. VICTORY. I am extremely excited about a very mundane detail of this.
Let me back up. I will confess that even though I started a chore chart to help break down housecleaning tasks into small, manageable bites, I just couldn't bring myself to wash the kitchen floor. I've been meaning to do it since BEFORE Christmas. I know. Judge all you want. Here's the thing, though. To make that floor look presentable, you have to really scrub on your hands and knees, then use a magic eraser to scrub the grout in between even more. If you're lucky, it might look good for 5 seconds after it's washed. Then back to looking dingy/dirty. UGH.
So when I scheduled the floor installer, I told him I would be doing some sanding of walls/etc. and asked if I needed to wash/scrub the floor before they installed the floating floor over the top.
He said "Nah, we'll give it a good clean with the shop vac, but you don't have to wash or mop it."
I wanted to leap through the phone and give him a big kiss. Seriously. This tidbit of info has made my week. I have been putting off scrubbing that floor for MONTHS ... and now, I will not ever scrub that awful tile floor again. Praise heaven!
So, once the vents are arranged today, I'll work on sanding down my big, gaping opening between the living/dining rooms. Then I think I'll have to mud and sand one more time. THEN it will be time to prime + paint. Oh happy day! (not really, Erik won't let me do the painting above the cabinets b/c he's afraid I"ll fall, so he's going to have to do all of that ... and this boy has no love for wall painting).
Sunday, March 4, 2012
Trend alert!
Oh dear.
I've never been one to be "in" on the latest trend, but it appears I've unwittingly become so.
When we painted our middle bedroom a vibrant orange, I wasn't thinking 'orange will be the next big THING!' I was thinking how bold, playful and fun it was. Yet as I was reading through a magazine recently, Tangerine Tango is the 2012 color of the year.

Yikes! I'm in on a trend! And completely by accident!
Let's just be sure 'the record' (whatever that is, and whoever actually keeps it) reflects that we painted our room in Nov. 2011 ... BEFORE the 'trend' was announced. Also, the color had been in the works for a good 4-6 months. So we're way ahead of the curve at the Bonar household!
And, remember my cute owls?

I picked out an owl clock seriously almost 2 years ago. I wasn't really looking much at decor at that point, but evidently it was the start of an owl up-swing. Because now I see them EVERYWHERE .... don't get me wrong, they're super cute and all. But do I really want to do something that's 'trendy' for a room? I guess I'll just try to go with subtle, and not over the top with a sort of 'theme' of them ... we'll see how it goes.
As a matter of fact, I am *almost* ready to share this complete/finished room! I have managed to paint all of the trim/built ins. The shelf/desk setup that I've been itching to get is with my bro in KC, and I'm just waiting for it to make its way here so we can assemble it - I seriously cannot wait for it to arrive!
Now just to get the hinges in for my built-ins. And then, of course, decide on handles for the drawers. I'm currently trying to decide if these owl nobs are too much. Also, can't decide if this owl light plate is too 'theme-y.'
I've never been one to be "in" on the latest trend, but it appears I've unwittingly become so.
When we painted our middle bedroom a vibrant orange, I wasn't thinking 'orange will be the next big THING!' I was thinking how bold, playful and fun it was. Yet as I was reading through a magazine recently, Tangerine Tango is the 2012 color of the year.
Yikes! I'm in on a trend! And completely by accident!
Let's just be sure 'the record' (whatever that is, and whoever actually keeps it) reflects that we painted our room in Nov. 2011 ... BEFORE the 'trend' was announced. Also, the color had been in the works for a good 4-6 months. So we're way ahead of the curve at the Bonar household!
And, remember my cute owls?
I picked out an owl clock seriously almost 2 years ago. I wasn't really looking much at decor at that point, but evidently it was the start of an owl up-swing. Because now I see them EVERYWHERE .... don't get me wrong, they're super cute and all. But do I really want to do something that's 'trendy' for a room? I guess I'll just try to go with subtle, and not over the top with a sort of 'theme' of them ... we'll see how it goes.
As a matter of fact, I am *almost* ready to share this complete/finished room! I have managed to paint all of the trim/built ins. The shelf/desk setup that I've been itching to get is with my bro in KC, and I'm just waiting for it to make its way here so we can assemble it - I seriously cannot wait for it to arrive!
Now just to get the hinges in for my built-ins. And then, of course, decide on handles for the drawers. I'm currently trying to decide if these owl nobs are too much. Also, can't decide if this owl light plate is too 'theme-y.'
Subscribe to:
Posts (Atom)